Sunday, January 29, 2012

DIY: Spike phone case


This DIY project has been along time coming. I had seen this phone case on Bleach Black and thought it was pretty spunky. However when I saw this tutorial I decided that I should have a go. So I headed straight to ebay for supplies. Glorious ebay. I decided to go for a bit of a less severe spike then the other two cases and thought that gold would give it a good look.


What You'll Need:


  • Screw in spikes (I got mine from ebay)
  • Silicone phone case (ebay again, I chose black but you can use any colour)
  • Safety pin
  • Metallic pen
  • Pig stabber (I didn't know what it was called and was kinda shocked when I found out) 


 I was going to do a whole step by step process for you here but the truth is that this DIY doesn't even have that many steps, it isn't really hard at all. 

First have a play with your spikes and see how you want to arrange them on your case. I decided to go with about 1.5cm between each spike. Next you have to use your metallic pen to mark out where you want the spikes. 

Next I used a safety pin to make a small whole where the first spike was going through, then I used the 'pig stabber' to go through this whole and make it a little bit bigger. You need to be careful not to rip the silicone when you are doing this part. If you don't have a 'pig stabber' you can use anything, like a bottle opener or metal skewer. 

Finally put the bottom (screw) part of the spike through the silicone case then twist the top (spike) part on until it is tight. Now Repeat this several times until all your spikes are in place.  


 Ta- da My finished product:


 p.s. Did that even make sense? 

Saturday, January 28, 2012

Whats Happening.

Two of my favorite blogs are Cupcakes and Cashmere and Sweet Thing. And rather coincidentally they both do a kind of 'whats been happening to me' post. Emily of cupcakes and Cashmere does a Five things post and Jessie of Sweet thing does a Lately post. I love that they both share things that are happening in there lives with us so I've decided to give it a go as well with a series I've decided to call 'Whats Happening'.


Yesterday I went to a six hour long cupcake decorating and macaroon masterclass. It was fun, although out macaroons didn't turn out exactly as planned. We were taught all different types of techniques for using royal icing, and whilst everyone else was making pretty bows and love hearts I was making bugs and monsters. It was Australia day this week so we got a public holiday, I treated myself to a DIY project (post coming soon)during the day and then met up with friends at an outdoor concert with fireworks in the evening. I love Taco night so its always exciting when that happens.  

Monday, January 23, 2012

The Campaign: Tony Bianco AW12


I was so excited to see an email from the lovely Jasmin over at friend in fashion this afternoon because I knew it could only mean one thing... Tony Bianco campaign shots. As I said in my previous Behind the scenes post the campaign features the always beautiful Bambi Northwood-Blyth with Photography by Bec Parsons.Head on over to Tony Bianco to check out more of these amazing shoes. I really think those first boots need to become a part of my shoe collection! 

Sunday, January 22, 2012

Birthday Cake


With this weekend being one of my Best friends 21st Birthday, it was the perfect opportunity to do some baking. After seeing this post on Cupcakesandcashmere I really wanted to have a proper go at a layer cake so I headed over to Smitten Kitchen for some layer cake tips. One thing that I have never done before is frozen my cake before working with it, but when making layer cakes Deb from Smitten Kitchen suggests freezing each layer to make it easy to cut it.  


I was so happy with how it turned out and everybody enjoyed it.


Photos from My friends Birthday dinner Via my Instagram


Thursday, January 19, 2012

Behind The Scenes With Tony

Tony Bianco that is. The beautiful Jasmin over at Friend in Fashion sent me an email earlier this week with some awesome behind the scene shots from the new Tony Bianco W12 campaign shoot. The beautiful Bambi Northwood-Blyth again fronts the camera for this campaign with  Bec Parsons behind the camera and styling by Trevor Stone. 


Head on over to the Tony Bianco blog to read about Bambi's shoot and see some more photos. Also remember to keep an eye out for the new campaign which will be out before you know it. Big thanks to Jasmin! I like to think of her as Princess Jasmin. I think it fits pretty well. Princess Jasmin is pretty fashionable too, what with her harem  pants and crop top.   

Wednesday, January 4, 2012

Little Spark

I'm not gonna lie, I'm uber excited for the upcoming release of Jessie Baylin's new album, Little Spark. If this girls other albums are anything to go by this one is sure not to disappoint. If you haven't heard of her I suggest you familiarize yourself soon! 

Shes so lovely she's even given us a free EP which you can download here and I highly recommend you to, its perfect for lazy days by the pool, or cooking up a storm in the kitchen, or even a road trip. What are you waiting for, go and download it now. 


Go on give her a listen, I promise you wont regret it. My personal favourite at the moment is one off her album firesight called crazy love. And if that video doesn't make you wanna listen to the record then I don't know what will!


xx


p.s. I am also so in love with the setting of her wedding to Kings Of Leon Drummer Nathan Followill, such a beautiful country setting, if your a wedding girl you should definitely check out her photos 

Tuesday, January 3, 2012

Ouch.

Last year I never really got into the whole pinterest thing. I got the account. I played around with it for a couple weeks but then never really went any further with it. This year (yeah I know new years resolution ha)I aim to get a bit more into it. I mean its as simple as clicking a button right? 


Ouch, get it now? Im pretty Punny hey. Okay Ill stop now. Oops I totally just got distracted reading Chrissy Teigen's blog. But I'm back now. And more to the point here are some of my fav finds on pinterest.


I love 1. Just because its true, and number 4. how can you not love that cute baby, it's in a shark suit. And I think that 3. is the coolest idea if you had the space and the decor to go with it, which I don't.  


Pinterest is also a great place to find recipes and get cooking inspiration. I quiet often find myself heading there when I have a birthday cake or a speial occasion to cook for. I've actually made number the cookie monster cookies and posted about it here. They were a raging success. 

So if you haven't got pinterest get on it. And if you have, well follow me. Let's get pinning. (Ha when I frist typed that it said punning, lets get punning, get it, okay sorry, its really hot)

xx


Sunday, January 1, 2012

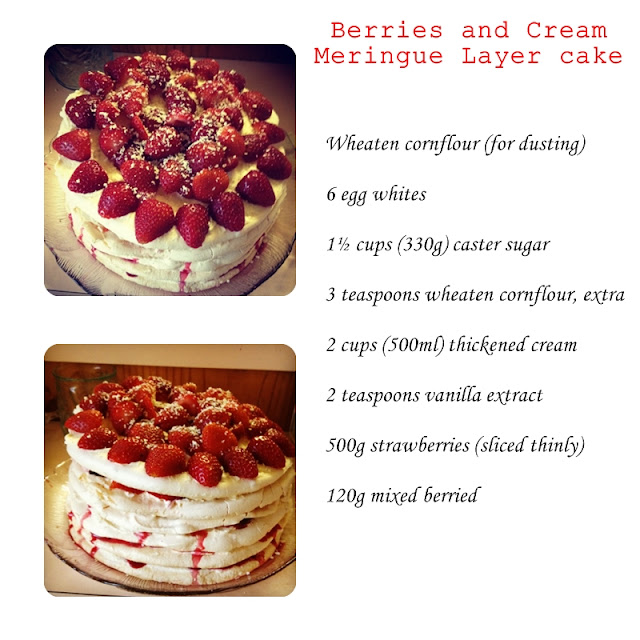
Spoons: Berries and cream meringue layer cake

Me and my Ma spent boxing day this year cooking up a storm in my nans kitchen. After having Christmas day at my nans place we were driving to our cousins place the day after boxing day for another Christmas dinner. We made cinnamon scrolls and this amazing layer cake. 


I followed this recipe from Women's Weekly with a couple of little alterations. 

1. Preheat Oven to about 120°C

2. Draw a 20cm circle on baking paper, use this paper to line 2 baking trays, grease paper and dust with some cornflour

3. In a small bowl combine two egg whites and 1/2 cup of sugar, beat with an electric mixer on high until thick and glossy then stir in an extra teaspoon of cornflour

3. Divide the mixture between the two baking trays, spreading to cover the circles

4. Bake for about one hour or until meringue is firm and dry, cool in oven with door ajar (this part is important because if the meringue cools down too quickly it may crack)

5. repeat steps 2 through 4 two more times giving you a total of six meringue rounds (you may want to make an extra one too in case you have any meringue mishaps) 

6. Whip your cream and vanilla until it forms soft peaks

7. Peel your first Meringues away from paper, spread cream on top and layer with berries, repeat for remaining layers

8. Arange remaining cream and berries on top of cake and 'dust' with grated chocolate flakes


You'll be amazing at how easy this actually is to make. The only thing is that it does take a long time because you have to make the six meringues. It also doesn't hurt if you make the meringue the day before you plan on making the cake, I did and it was perfectly fine.

Believe me when I say it even tastes better then it looks...